WordPress wizard in admin – step by step

Challenge: create wizard configurator in wp-admin
Solution: add custom admin pages, redirect forms to next step, add JS submit and hide main menu
Wizard configurator in wordpress dashboard area is nice thing to have. Undistracted Administrator can follow wizard steps and configure plugin settings one by one. Nowadays a lot of wordpress plugins are adding this feature (example: SEO Yoast) because it is user friendly and quick setup is something everybody likes.

Wizard configurator in wp-admin
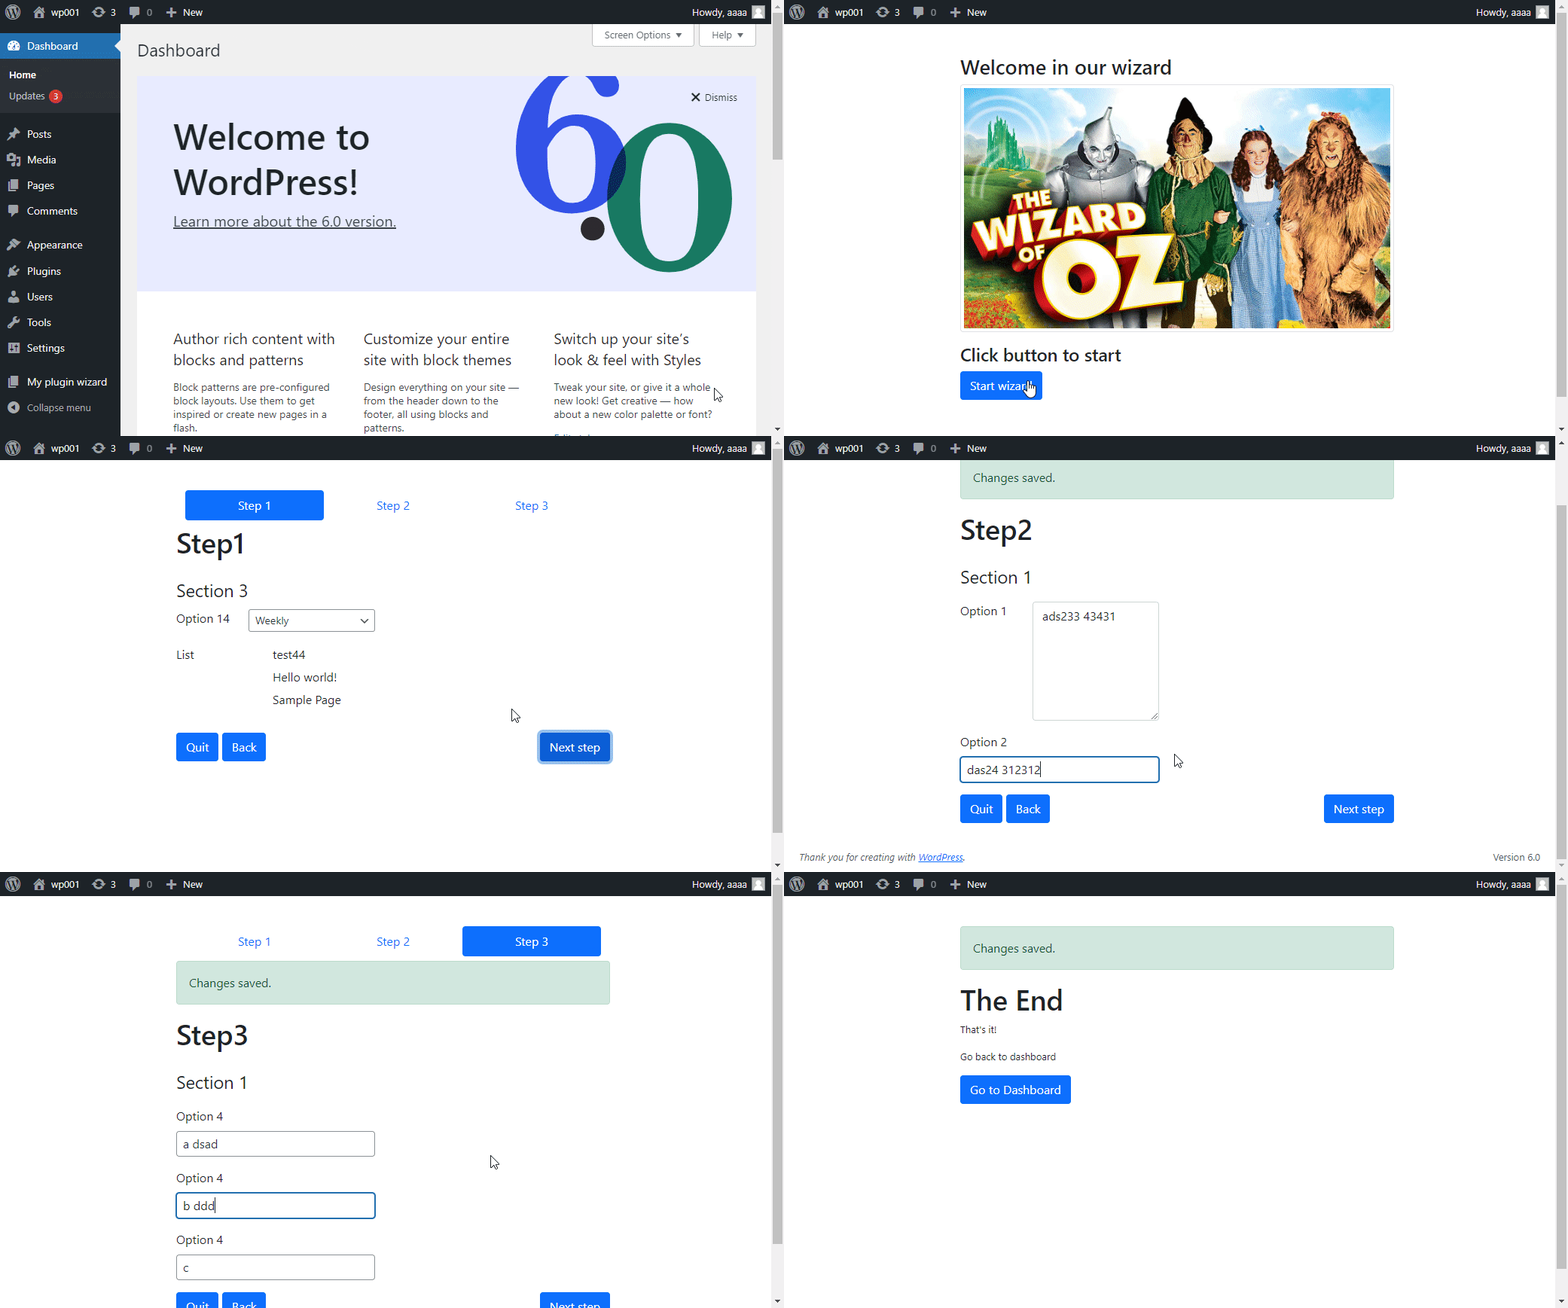
In this tutorial we will learn how to create step by step forms with pagination: Back / Next Step. All admin elements will be hidden to allow user to focus on wizard only. In addition: we will add options to jump between steps and always save current form! For example: you can start in step1 and jump directly to step3. Your changes from step1 will be automatically saved!
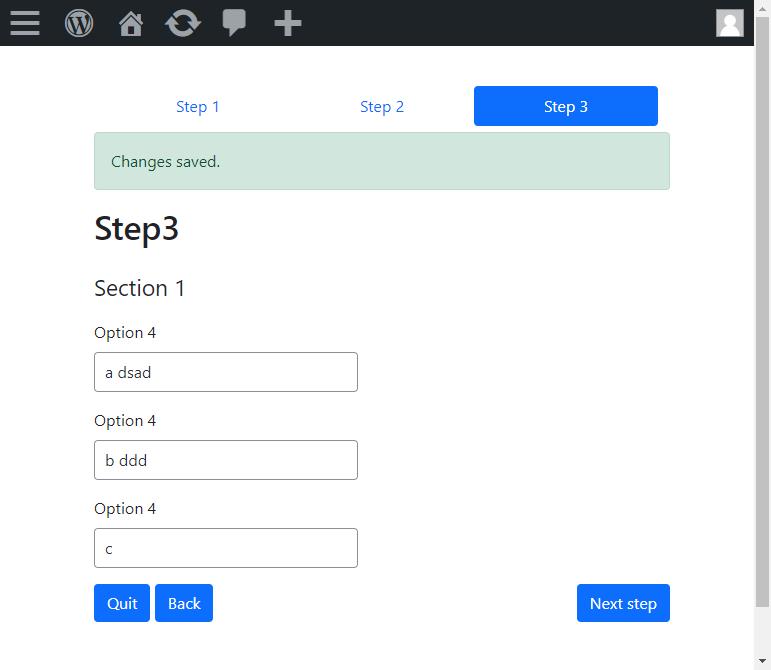
Custom admin pages
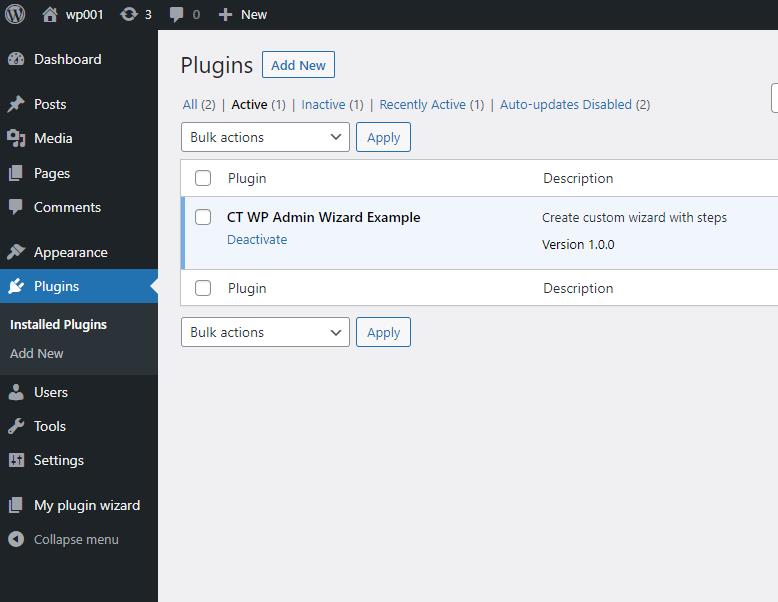
Our plugin is using wordpress built-in function: add_menu_page to create new section in Admin Dashboard Area. add_submenu_page is used to handle steps (query param &step=step0). That’s it, having it defined – we can add as many steps as we like!
First parameter of add_submenu_page set to null makes submenu hidden. Our wizard will be available in admin menu as: My plugin wizard.
// ct-wp-wizard-admin/includes/class-ct-wp-wizard-admin.php

public function add_menu_page()

{

    add_menu_page(

        esc_html__('My plugin wizard', 'ct-admin'),

        esc_html__('My plugin wizard', 'ct-admin'),

        'manage_options',

        $this->get_id(),

        array(&$this, 'load_view'),

        'dashicons-admin-page'

    );

    /**

     * hidden view for steps

     */

    add_submenu_page(

        null,

        esc_html__('Wizard steps', 'ct-admin'),

        esc_html__('Wizard steps', 'ct-admin'),

        'manage_options',

        $this->get_id() . '&step=step0',

        array(&$this, 'load_view')

    );

}
Loading main wizard structure
Method load_view is including all partials: navigation for steps, alerts, content for steps and footer navigation.
protected $views = array(

    'step0' => 'views/step0',

    'step1' => 'views/step1',

    'step2' => 'views/step2',

    'step3' => 'views/step3',

    'step4' => 'views/step4',

    'alerts' => 'views/alerts',

    'not-found' => 'views/not-found'

);

function load_view()

{

    $this->default_values = $this->get_defaults();

    $this->current_page = ct_admin_wizard_current_step();

    $current_views = isset($this->views[$this->current_page]) ? $this->views[$this->current_page] : $this->views['not-found'];

    $step_data_func_name = $this->current_page . '_data';

    $args = [];

    /**

     * prepare data for view

     */

    if (method_exists($this, $step_data_func_name)) {

        $args = $this->$step_data_func_name();

    }

    /**

     * Default Admin Form Template

     */

    echo '<div class="ct-wizard-admin ' . $this->current_page . '">';

    echo '<div class="container container1">';

    echo '<div class="inner">';

    $this->includeWithVariables(ct_admin_template_server_path('views/nav', false));

    $this->includeWithVariables(ct_admin_template_server_path('views/alerts', false));

    $this->includeWithVariables(ct_admin_template_server_path($current_views, false), $args);

    $this->includeWithVariables(ct_admin_template_server_path('views/foot', false));

    echo '</div>';

    echo '</div>';

    echo '</div> <!-- / ct-wizard-admin -->';

}
Hiding parts of admin area
For better user experience we’re going to add some CSS to hide not needed elements. Desired result: being in dashboard area – we would like to see only our wizard. Menu and footer will be hidden. Additional sr-only class is used for hiding form submit (we will use jQuery to click hidden submit button).
/**

/ct-wp-wizard-admin/assets/style.css

 */

body.toplevel_page_ct-wizard-admin #adminmenumain {

    display: none !important;

}

body.toplevel_page_ct-wizard-admin #wpcontent {

    margin-top: 40px;

}

body.toplevel_page_ct-wizard-admin #wpcontent,

body.toplevel_page_ct-wizard-admin #wpfooter {

    margin-left: 0;

}

body.toplevel_page_ct-wizard-admin .container {

    max-width: 600px;

}

.sr-only {

    position: absolute;

    width: 1px;

    height: 1px;

    padding: 0;

    overflow: hidden;

    clip: rect(0, 0, 0, 0);

    white-space: nowrap;

    -webkit-clip-path: inset(50%);

    clip-path: inset(50%);

    border: 0;

}
Wizard step (template)
Single step is just form with fields. Submit button is hidden using CSS (sr-only class). We’re going to submit the form using JavaScript. By clicking any button or navigation with steps we will: update input ‘redirectToUrl’ (where to redirect after submit) and simulate clicking the submit input.
Here is example template view for step3:
<?php

// ct-wp-wizard-admin/views/step3.php

/** @var string $option4 */

/** @var string $option5 */

/** @var string $option6 */

?>

<h1><?php echo esc_html__('Step3', 'ct-admin'); ?></h1>

<form method="POST" action="<?php echo esc_html(admin_url('admin-post.php')); ?>" class="js-form-wizard">

    <input type="hidden" name="action" value="ct_admin_save">

    <?php wp_nonce_field('ct_admin_save', 'ct_admin'); ?>

    <input type="hidden" name="redirectToUrl" value="<?php echo ct_admin_wizard_step_url('step4'); ?>">

    <div class="row g-5">

        <div class="col-md-6">

            <fieldset class="mt-3">

                <legend class="mb-3"><?php echo esc_html__('Section 1', 'ct-admin') ?></legend>

                <div class="mb-3">

                    <label for="cookie_content"

                           class="form-label"><?php echo esc_html__('Option 4', 'ct-admin') ?></label>

                    <?php echo $option4; ?>

                </div>

                <div class="mb-3">

                    <label for="cookie_content"

                           class="form-label"><?php echo esc_html__('Option 4', 'ct-admin') ?></label>

                    <?php echo $option5; ?>

                </div>

                <div class="mb-3">

                    <label for="cookie_content"

                           class="form-label"><?php echo esc_html__('Option 4', 'ct-admin') ?></label>

                    <?php echo $option6; ?>

                </div>

            </fieldset>

        </div>

    </div>

    <!-- / row -->

    <?php ct_admin_submit(esc_html__('Submit')); ?>

</form>

Javascript (jQuery) code for triggering form submit:

// ct-wp-wizard-admin/assets/custom.js

(function($) {

    $(".js-save-and-go").click(function(){

        const $that = $(this);

        const backUrl = $that.attr("href");

        $('.js-form-wizard input[name=redirectToUrl]').val(backUrl);

        $(".js-form-wizard #submit5").click();

    });

    $(".js-submit").click(function(){

        $(".js-form-wizard #submit5").click();

    });

})( jQuery );
Form fields
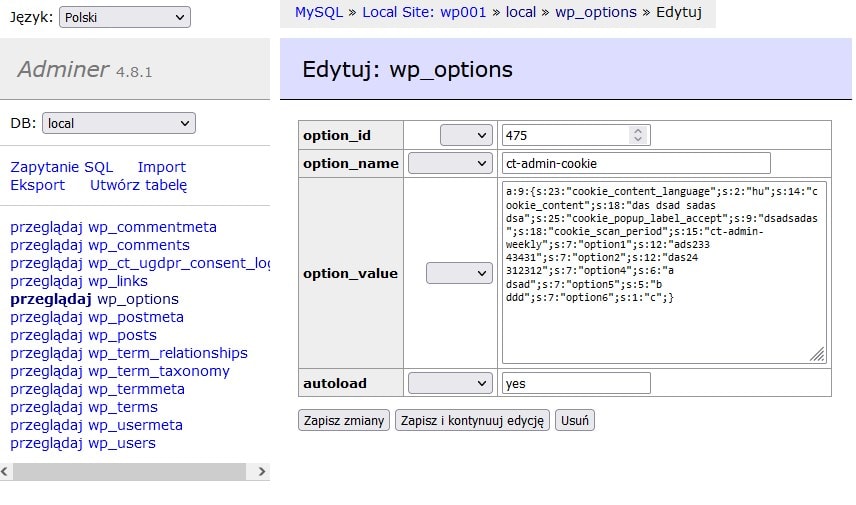
Form data is saved in wp_options as serialized array of key and value. Currently we have 4 different types of fields: text input, textarea, checkbox and dropdown select. Let’s see example of fields in step3:
private function step3_data()

{

    $args['option4'] = $this->render_input('ct-admin-cookie', 'option4');

    $args['option5'] = $this->render_input('ct-admin-cookie', 'option5');

    $args['option6'] = $this->render_input('ct-admin-cookie', 'option6');

    return $args;

}
After submit – Data from step3 will be saved in wordpress database, table wp_options – as:
- option_name: ct-admin_cookie
- option_value: serialized array of keys and values set in the form
Database MYSQL is storing serialized data:
a:9:{s:23:"cookie_content_language";s:2:"hu";s:14:"cookie_content";s:18:"das dsad sadas dsa";s:25:"cookie_popup_label_accept";s:9:"dsadsadas";s:18:"cookie_scan_period";s:15:"ct-admin-weekly";s:7:"option1";s:12:"ads233 43431";s:7:"option2";s:12:"das24 312312";s:7:"option4";s:6:"a dsad";s:7:"option5";s:5:"b ddd";s:7:"option6";s:1:"c";}If we decided to read this data from DB and unserialize it – this will be the result:
array (

    'cookie_content_language' => 'hu',

    'cookie_content' => 'das dsad sadas dsa',

    'cookie_popup_label_accept' => 'dsadsadas',

    'cookie_scan_period' => 'ct-admin-weekly',

    'option1' => 'ads233 43431',

    'option2' => 'das24 312312',

    'option4' => 'a dsad',

    'option5' => 'b ddd',

    'option6' => 'c',

)
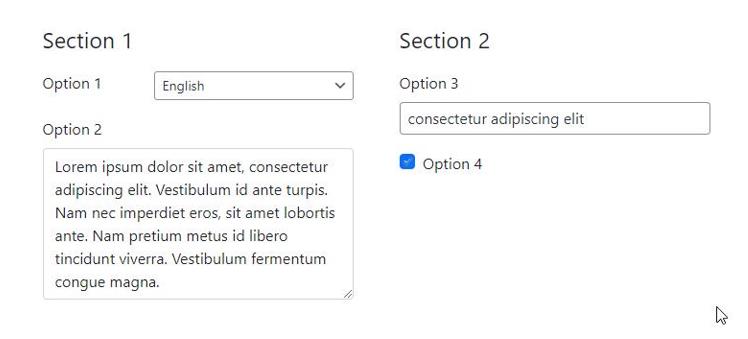
Form fields types – example
In our forms we can use different types of fields, including: text input, dropdown select, textarea and checkbox choice. It’s very easy to define new fields, just fill in $args array. Example for all 4 types:
private function view999_data()

{

    $args = [];

    $values = array(

        '' => esc_html__('Select', 'ct-admin'),

        'cs' => 'Čeština',

        'de' => 'Deutsch',

        'en' => 'English',

        'es' => 'Español',

        'fr' => 'Français',

        'hr' => 'Hrvatski',

        'hu' => 'Magyar',

        'no' => 'Norwegian',

        'it' => 'Italiano',

        'nl' => 'Nederlands',

        'pl' => 'Polski',

        'pt' => 'Português',

        'ro' => 'Română',

        'ru' => 'Русский',

        'sk' => 'Slovenčina',

        'dk' => 'Danish',

        'bg' => 'Bulgarian',

        'sv' => 'Swedish'

    );

    $args['cookie_content_language'] = $this->render_select('ct-admin-cookie', 'cookie_content_language', $values);

    $args['cookie_content'] = $this->render_textarea('ct-admin-cookie', 'cookie_content');

    $args['cookie_popup_label_accept'] = $this->render_input('ct-admin-cookie', 'cookie_popup_label_accept');

    $args['forgotten_automated_forget'] = $this->render_checkbox('ct-admin-forgotten', 'forgotten_automated_forget');

    return $args;

}
Navigation
Top navigation is defined in: /ct-wp-wizard-admin/views/nav.php . It’s showing steps from 1 to 3. But you can easily extend it and have as many steps as you would like.
private function view999_data()

{

    $args = [];

    $values = array(

        '' => esc_html__('Select', 'ct-admin'),

        'cs' => 'Čeština',

        'de' => 'Deutsch',

        'en' => 'English',

        'es' => 'Español',

        'fr' => 'Français',

        'hr' => 'Hrvatski',

        'hu' => 'Magyar',

        'no' => 'Norwegian',

        'it' => 'Italiano',

        'nl' => 'Nederlands',

        'pl' => 'Polski',

        'pt' => 'Português',

        'ro' => 'Română',

        'ru' => 'Русский',

        'sk' => 'Slovenčina',

        'dk' => 'Danish',

        'bg' => 'Bulgarian',

        'sv' => 'Swedish'

    );

    $args['cookie_content_language'] = $this->render_select('ct-admin-cookie', 'cookie_content_language', $values);

    $args['cookie_content'] = $this->render_textarea('ct-admin-cookie', 'cookie_content');

    $args['cookie_popup_label_accept'] = $this->render_input('ct-admin-cookie', 'cookie_popup_label_accept');

    $args['forgotten_automated_forget'] = $this->render_checkbox('ct-admin-forgotten', 'forgotten_automated_forget');

    return $args;

}
WordPress Wizard plugin configuration Previous / Next
Nice feature will be to add additional buttons in footer: Quit Wizard, Previous Step and Next Step. Quiz Wizard is just simple link that redirect to dashboard. Other 2 buttons are submitting the form programmatically (see custom.js)
<?php

// ct-wp-wizard-admin/views/foot.php

if ((!ct_admin_wizard_is_step('step0'))): ?>

    <?php if ((!ct_admin_wizard_is_step('step4'))): ?>

        <div class="float-start">

            <a href="<?php echo admin_url(); ?>"

               class="btn btn-primary"><?php _e("Quit") ?></a>

            <button href="<?php echo ct_admin_wizard_prev_step(); ?>"

                    class="btn btn-primary js-save-and-go"><?php _e("Back") ?></button>

        </div>

        <div class="float-end">

            <button class="btn btn-primary js-submit"><?php _e("Next step") ?></button>

        </div>

    <?php endif; ?>

<?php endif; ?>
Wizard screencast and source code
Working plugin source code “CT WP Admin Wizard Example” is available on GitHub : https://github.com/createit-dev/117-wordpress-wizard-in-admin-step-by-step
Feel free to clone it and checkout it out.
In addition – attached screencast from wp-admin area. See how plugin is working!
If you are looking for custom web app development reach our team of professional developers!


