Shop listing variable Product add to cart

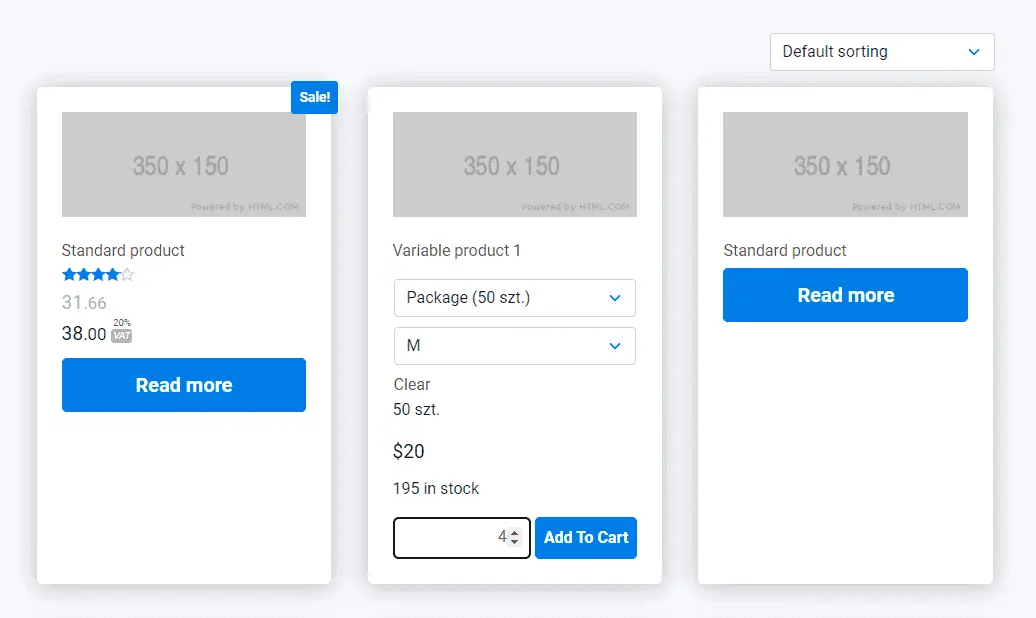
CHALLENGE: allow WooCommerce customers to choose variations directly on product listing
SOLUTION: overwrite the content-product.php template and add custom javascript
The WooCommerce shop listing presents a list of products. Usually, normal products include the ‘Add to cart’ button, but products with the “variable” type only have the ‘Read more’ button: you need to go to the single product view, and there you have the ability to choose the proper variations and add an item to the cart.
It would be great to have a nice and user friendly feature allowing the Customer to pick sizes / colors directly on product listing. Instead of navigating to a single product page, the user can shop using the main listing view.
Custom Add to cart
We’re going to add the ability to pick variations directly on shop listing. One WooCommerce template – content-product.php will be overwritten in the theme.
<?php
/**
 * wp-content/themes/mytheme/woocommerce/content-product.php
 * Code by John Enrick
 */
defined( 'ABSPATH' ) || exit;
global $product;
$variations = [];
if(get_class($product ) != 'WC_Product_Simple'){
   $variations = $product->get_variation_attributes();
}
$link = apply_filters( 'woocommerce_loop_product_link', get_the_permalink(), $product );
// Ensure visibility.
if ( empty( $product ) || ! $product->is_visible() ) {
   return;
}
?>
<li <?php wc_product_class( '', $product ); ?>>
   <?php
   /**
    * Hook: woocommerce_before_shop_loop_item.
    *
    * @hooked woocommerce_template_loop_product_link_open - 10
    */
   if(count($variations)){
      do_action( 'woocommerce_before_shop_loop_item' );
   }


   /**
    * Hook: woocommerce_before_shop_loop_item_title.
    *
    * @hooked woocommerce_show_product_loop_sale_flash - 10
    * @hooked woocommerce_template_loop_product_thumbnail - 10
    */
   woocommerce_template_loop_product_link_open();

   do_action( 'woocommerce_before_shop_loop_item_title' );
   /**
    * Hook: woocommerce_shop_loop_item_title.
    *
    * @hooked woocommerce_template_loop_product_title - 10
    */
   do_action( 'woocommerce_shop_loop_item_title' );
   /**
    * Hook: woocommerce_after_shop_loop_item_title.
    *
    * @hooked woocommerce_template_loop_rating - 5
    * @hooked woocommerce_template_loop_price - 10
    */
   do_action( 'woocommerce_after_shop_loop_item_title' );
   woocommerce_template_loop_product_link_close();
   if(count($variations)){
      remove_action('woocommerce_after_shop_loop_item', 'woocommerce_template_loop_product_link_close');
      do_action( 'woocommerce_' . $product->get_type() . '_add_to_cart' );
   }
   do_action( 'woocommerce_after_shop_loop_item' );
   /**
    * Hook: woocommerce_after_shop_loop_item.
    *
    * @hooked woocommerce_template_loop_product_link_close - 5
    * @hooked woocommerce_template_loop_add_to_cart - 10
    */


   ?>
</li>
Listen to variation changes
Typically, product variations can have multiple parameters, like: sizes, colors etc. Each variation also includes a separate price and an individual stock amount. It’s important to reload those values dynamically and display proper values to the Customer.
The function wp_localize_script will help with passing translations to the javascript file. We’re using built-in WooCommerce phrases that are already translated. So, the function will work nicely in all languages that WooCommerce supports. Translations handle both possibilities: adding 1 or multiple products to the cart: ‘%s has been added to your cart.’ vs ‘%s have been added to your cart.’
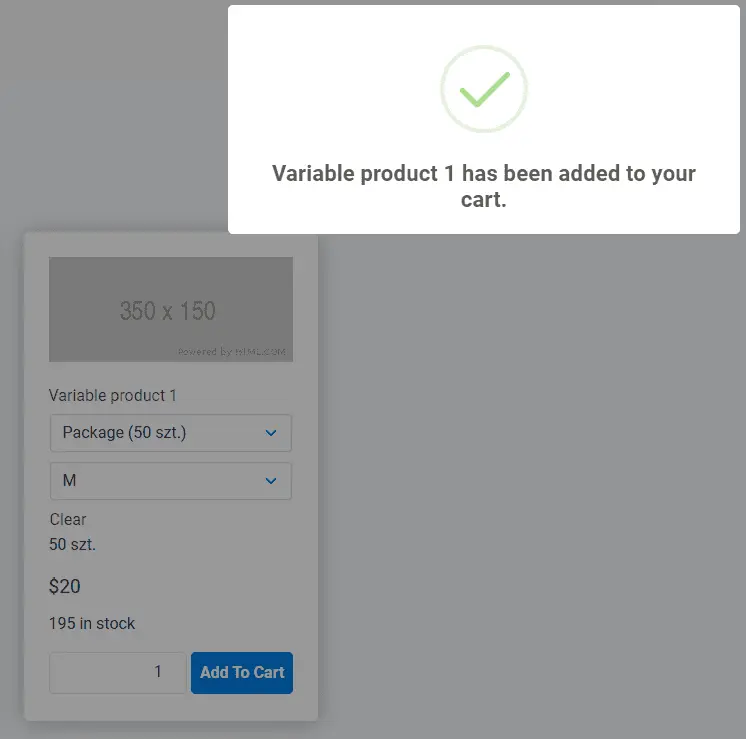
Add to cart for “variable product” uses AJAX reload, so the page will not be refreshed. To enhance user experience, we’re going to add an additional sweetalert modal that will confirm the product has been added to the cart.
Enqueuing assets and definitions for text translations are added in functions.php :
/**
 * functions.php
 */
add_action( 'wp_enqueue_scripts', 'ct_scripts', 10 );
function ct_scripts() {
    $storefront_version = 5;
    if(is_woocommerce() && !is_product()){
        wp_enqueue_script('sweetalert2-js', get_template_directory_uri() . '/assets/js/sweetalert2.all.min.js', array(), $storefront_version, true );
        wp_enqueue_script('product-loop', get_template_directory_uri() . '/woocommerce/assets/js/frontend/product-loop.js', array(), $storefront_version, true );
        wp_localize_script('product-loop', 'cartSettings', array(
            'cart_url' => wc_get_cart_url(),
            'item_added_message' => _n( '%s has been added to your cart.', '%s have been added to your cart.', 1, 'woocommerce' ),
            'item_added_message2' => _n( '%s has been added to your cart.', '%s have been added to your cart.', 2, 'woocommerce' ),
            'add_to_cart' => __( 'Add to cart', 'woocommerce' ),
            'view_cart' => __( 'View cart', 'woocommerce' ),
            'select' => __( 'Select options', 'woocommerce' )
        ));
    }
}
Ajax Add to cart
Custom JS will handle ajax add to cart, displaying a confirmation message, an alert popup and hiding unused item elements:
// wp-content/themes/mytheme/woocommerce/assets/js/frontend/product-loop.js
// Code by John Enrick
(function($){
    function addItemAddedMessage(productName, addedQuantity){
        var msg =  cartSettings.item_added_message.replace("%s", productName);
        if(addedQuantity>1){
            msg =  addedQuantity + ' x ' + cartSettings.item_added_message2.replace("%s", productName);
        }
        var viewCart = cartSettings.view_cart;
        var cartUrl = cartSettings.cart_url;
        $('.container > .woocommerce').html(`
            <div class="woocommerce-message" role="alert">
              <a href="${cartUrl}" class="button wc-forward">${viewCart}</a>
              ${msg}
            </div>
        `)
        $('.item--menu-cart .cart-basket').text(($('.item--menu-cart .cart-basket').text() * 1) + addedQuantity)
        Swal.fire({
            position: 'top-end',
            icon: 'success',
            title: msg,
            showConfirmButton: false,
            timer: 1500
        })
    }
    function submitVariableAddToCart(event){
        var form = $(this)
        form.find('.single_add_to_cart_button').css('min-width', getComputedStyle(form.find('.single_add_to_cart_button')[0]).width)
        form.find('.single_add_to_cart_button').attr('disabled', true)
        form.find('.single_add_to_cart_button').addClass("loading");
        event.preventDefault()
        var formDataArray = form.serializeArray()
        var formData = {}
        formDataArray.forEach(function(input){
            formData[input['name']] = input['value']
        })
        $.ajax({
            type: 'POST',
            url: form.attr('action'),
            data: formData,
            success: function(response)
            {
                addItemAddedMessage(form.parent().find('.woocommerce-loop-product__title').text(), form.parent().find('.quantity input').val() * 1)
                form.find('.single_add_to_cart_button').removeClass("loading");
                setTimeout(function(){
                    form.find('.single_add_to_cart_button').attr('disabled', false)
                    form.find('.single_add_to_cart_button').text(cartSettings.add_to_cart)
                }, 100)
            },
            error: function(response)
            {
                form.find('.single_add_to_cart_button').attr('disabled', false)
                form.find('.single_add_to_cart_button').text(cartSettings.add_to_cart)
            }
        })
    }
    /**
     * Hide the Variable Add to Cart button if no variation is selected yet
     */
    function hideVariableAddToCartButtons(){
        $('ul.products > li.product.type-product .variations_form .single_variation_wrap').hide()
    }
    function changeVariationSelectDefaultText(){
        $('ul.products > li.product.type-product .variations select').each(function(){
            var label = $(this).parents('tr').find('label').text()
            label = label.toLowerCase().replace(/\b[a-z]/g, function(letter) {
                return letter.toUpperCase();
            });
            $(this).find('option:first-child').text(cartSettings.select +' ' + label)
        })
    }
    function listenVariationChange(){
        $('ul.products').on('change', '.variations select', function(){
            var tableElement = $(this).parents('table.variations')
            var hasSelectWithValue = false;
            tableElement.find('select').each(function(){
                if($(this).val() !== '' && $(this).val() != '0'){
                    hasSelectWithValue = true
                    return false
                }
            })
            var cardContainer = tableElement.parents('li.product')
            if(hasSelectWithValue){
                cardContainer.find('.single_variation_wrap').show()
                cardContainer.find('a.product_type_variable').hide()
            }else{
                cardContainer.find('.single_variation_wrap').hide()
                cardContainer.find('a.product_type_variable').show()
            }
        })
    }
    $(document).ready(function(){
        $('#content').on('submit', 'form.variations_form', submitVariableAddToCart)
        listenVariationChange()
        setTimeout(function(){
            hideVariableAddToCartButtons()
            changeVariationSelectDefaultText()
        }, 100)

    })
})(jQuery)
Product loop styling
The final step will be to add some styling. SCSS Sass style will adjust the position of elements and apply some basic look.
/**
wp-content/themes/mytheme/assets/scss/woocommerce/_product_loop.scss
 */
@mixin p-1(){
    padding: 0.5em!important;
}
ul.products li.product.type-product{
    .variations_form table.variations {
        width: 100%;
        select {
            margin-bottom:0.5rem;
        }
        td:first-child {
            display: none
        }
        td:last-child {
            width: 100%
        }
    }
    .woocommerce-variation-add-to-cart {
        display: flex;
        justify-content: flex-end;
        div.quantity {
            flex-grow: 1;
            padding-right: 4px;
            input {
                text-align: right;
                @include p-1();
                width: 100%;
            }
        }

        button {
            @include p-1();
            font-size: 1em!important;
            text-transform: capitalize;
            white-space: nowrap;
        }
    }

}
ul.products li.product.type-product.product-type-simple{
    form.cart {
        display: flex;
        justify-content: flex-end;
        div.quantity {
            flex-grow: 1;
            padding-right: 4px;
            input {
                text-align: right;
                @include p-1();
                width: 100%;
            }
        }

        button {
            @include p-1();
            font-size: 1em!important;
            text-transform: capitalize;
            white-space: nowrap;
        }
    }
}

That’s it for today’s tutorial. Be sure to follow us for other useful tips and guidelines.


