Docker Compose for PrestaShop
Challenge: run PrestaShop locally using Docker
Solution: use Docker Compose containers
Setting up a local development environment for PrestaShop can sometimes be a daunting task, especially when aiming for consistency across different systems. This is where Docker comes into play, offering a convenient solution for creating and managing isolated environments.
This blog post is dedicated to sharing a Docker Compose setup specifically tailored for local development of PrestaShop 8.1.2. Docker Compose simplifies the process of orchestrating multiple containers, allowing developers to define and run multi-container Docker applications.
Docker service breakdown
Moving into the heart of our Docker Compose setup, let’s deconstruct each service.
MySQL
The MySQL service stands as the data backbone of your PrestaShop site. The environment variables MYSQL_ROOT_PASSWORD and MYSQL_DATABASE are set to establish initial access credentials and to create a dedicated database for PrestaShop, respectively. The use of volumes, specifically dbdata:/var/lib/mysql, ensures that your data persists across container restarts, safeguarding your database against data loss.
Nginx: The Web Gateway
Nginx is configured to serve as the web server. It’s responsible for handling incoming HTTP requests and directing them to the PrestaShop container. The service is set to restart unless manually stopped, ensuring high availability. The configuration files for Nginx are mounted from the host to the container, allowing you to customize the server’s behavior as per your requirements. Furthermore, the ports directive maps port 8090 on the host to port 80 on the container, making your PrestaShop site accessible on your local machine.
PrestaShop: The Core Application
The PrestaShop service is the heart of your setup, running the actual PrestaShop 8.1.2 application. It relies on the MySQL service for its database needs, as indicated by the depends_on clause. The volumes, including ./modules/my_module:/var/www/html/modules/my_module and ./classes:/var/www/html/classes, are crucial for code development, allowing you to work on your custom modules and classes directly on your host machine, with changes reflecting in real-time within the container.
Adminer: The Database Interface
Adminer, though optional, provides a user-friendly web interface for database management. It’s particularly useful for inspecting and interacting with your MySQL database. The port mapping 8091:8080 ensures that Adminer is accessible through your local machine on port 8091, offering an isolated interface to manage your databases securely.
Network and Volume Management
The prestashop_network network acts as a communication bridge between your containers. It abstracts the complexity of container networking, allowing you to focus on development rather than network configuration.
In terms of volume management, psdata and dbdata are pivotal for data persistence. While psdata is instrumental for the PrestaShop service, maintaining your site’s files and customizations, dbdata ensures that your MySQL database remains intact across container lifecycles.
How to initialize all services – make working Prestashop Docker environment
Getting your PrestaShop environment up and running with Docker Compose is straightforward. Once you’ve initialized all the services, you can easily access your PrestaShop site and other services like Adminer through specific URLs. Here’s a step-by-step guide:
Starting the Environment
- Open your terminal or command prompt.
- Navigate to the directory where your docker-compose.yml file is located.
- Run the command docker-compose up. This will start all the services defined in your Docker Compose file. You’ll see the logs for each service as they start up and begin communicating with each other.
- If you want to run your services in the background, you can use docker-compose up -d.
Accessing the Services
Once all services are up and running, you can access them using your web browser:
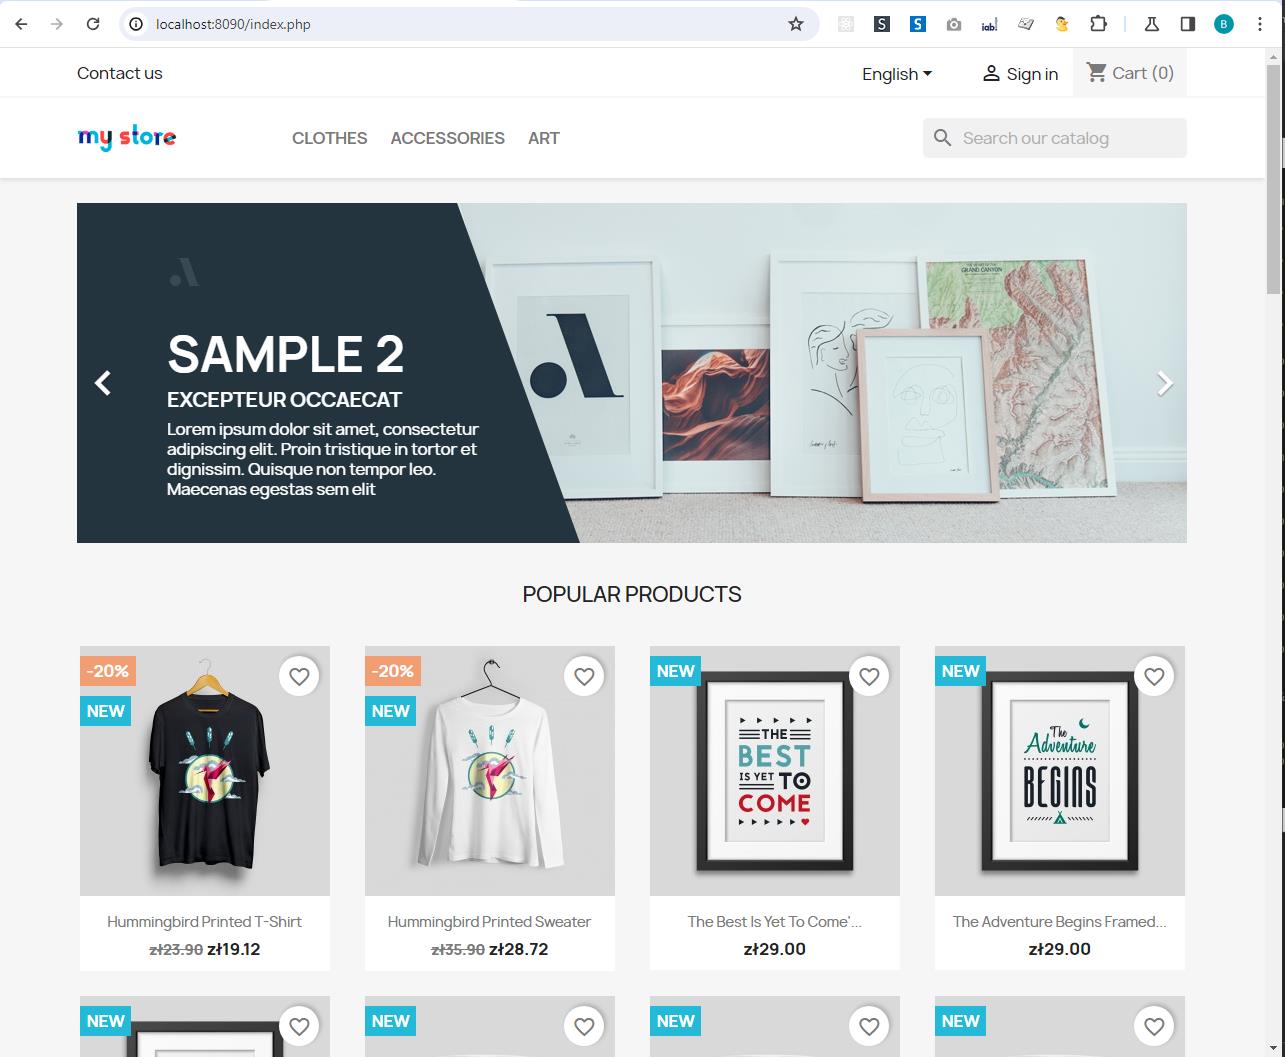
PrestaShop: since Nginx is set up to listen on port 8090 on your localhost, you can access your PrestaShop site by going to http://localhost:8090 in your browser. This will load your PrestaShop site, ready for you to develop or browse.
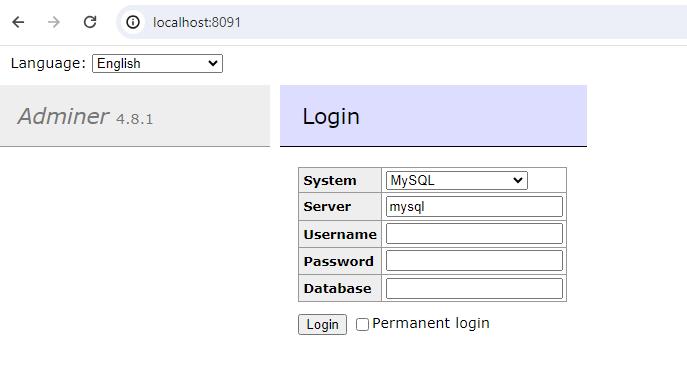
Adminer: adminer is configured to be accessible on port 8091. So, you can manage your PrestaShop database by visiting http://localhost:8091 in your browser. Use the MySQL credentials you’ve set in your Docker Compose file to log in and start managing your database.
First installation: To configure shop, you need to complete the wizard. Go to: http://localhost:8090/install9123 and follow PrestaShop instructions.
Troubleshooting Your PrestaShop Docker Environment
When developing with Docker and PrestaShop, encountering challenges and needing to troubleshoot is a natural part of the process.
Starting and Stopping Services
docker-compose up: This command spins up your entire Docker environment, initiating all the services defined in your docker-compose.yml file. It’s your go-to command to start your development session.
docker-compose down: Conversely, when you’re done, this command gracefully stops and removes all the containers defined in the Docker Compose file.
Checking Service Status
docker-compose ps: This command provides a quick overview of your currently running services. It’s useful to confirm that all services are up and running as expected.
Interacting with Containers
docker exec -it prestashop /bin/bash: Need to execute commands inside your PrestaShop container or explore its file system? This command drops you into a bash shell inside the container.
docker exec -it nginx /bin/bash: Similarly, if you need to interact with your Nginx container, this command will get you there.
Monitoring Logs
docker logs -f prestashop: Logs are invaluable when it comes to understanding what’s happening inside your containers. This command tails the logs from your PrestaShop container, offering real-time insight into its operations.
When using PrestaShop debug mode, commands like /var/www/html/var/logs# tail -n 100 -f dev-2024-01-27.log (executed within the PrestaShop container) can be incredibly insightful.
Adminer: Your Database Management
For database-related issues, Adminer is your ally. It provides a user-friendly interface to interact with your MySQL database. Remember the credentials you’ve set up in your Docker Compose file:
- DB_SERVER: mysql
- DB_NAME: prestashop
- DB_USER: root
- DB_PASSWD: root
With these credentials, you can log into Adminer and perform various database operations, whether it’s inspecting tables, running queries, or managing data.
Tips for a Smooth Experience
Check Port Availability: Ensure the ports 8090 and 8091 are free on your local machine. If they’re already in use, you might need to either free them up or configure different ports in your Docker Compose file.
Data Persistence: Remember, the volumes you’ve set up in your Docker Compose file ensure that your data persists across container restarts. This means your site data and database changes won’t be lost when you stop your Docker containers.
Project structure
You just need:
– /modules/my_module/ directory where your module files are added.
– docker-compose.yml
– nginx.conf
Here is ready to use PrestaShop docker compose file for 8.1.2 shop version:
version: '3'
services:
  mysql:
    container_name: mysql
    image: mysql:5.7
    restart: unless-stopped
    environment:
      MYSQL_ROOT_PASSWORD: admin
      MYSQL_DATABASE: prestashop
    networks:
      - prestashop_network
    volumes:
      - dbdata:/var/lib/mysql
  nginx:
    container_name: nginx
    image: nginx:latest
    restart: unless-stopped
    volumes:
      - ./nginx.conf:/etc/nginx/conf.d/default.conf
    volumes_from:
      - prestashop
    ports:
      - 127.0.0.1:8090:80
    networks:
      - prestashop_network
    depends_on:
      - prestashop

  prestashop:
    container_name: prestashop
    image: prestashop/prestashop:8.1.2-fpm
    restart: unless-stopped
    depends_on:
      - mysql
    environment:
      DB_SERVER: mysql
      DB_NAME: prestashop
      DB_USER: root
      DB_PASSWD: root
      PS_DOMAIN: localhost:8090
      PS_FOLDER_ADMIN: admin9123
      PS_FOLDER_INSTALL: install9123
    networks:
      - prestashop_network
    volumes:
    - ./modules/my_module:/var/www/html/modules/my_module
    - ./classes:/var/www/html/classes
    - psdata:/var/www/html

  adminer:
    image: adminer:latest
    restart: unless-stopped
    container_name: adminer
    ports:
      - "8091:8080" # Changed port mapping to reflect internal port
    environment:
      - ADMINER_DEFAULT_SERVER=mysql # Ensuring Adminer connects to the MySQL service
    networks:
      - prestashop_network
networks:
  prestashop_network:
volumes:
  psdata:
  dbdata:
And file nginx.conf:
server {
   listen 80;
   server_name _default;

   root /var/www/html;

   index index.php index.html index.htm;

   set $admin_dir /admin9123;

   location ~ /admin.*/(sell|api|common|_wdt|modules|improve|international|configure|addons|_profiler|product|combination|specific-price)/(.*)$ {
        try_files $uri $uri/ /index.php?q=$uri&$args $admin_dir/index.php$is_args$args;
   }

   location / {
        # Redirect pretty urls to index.php
        try_files $uri $uri/ /index.php?$args;

        # Images
        rewrite ^/([0-9])(-[_a-zA-Z0-9-]*)?(-[0-9]+)?/.+.jpg$ /img/p/$1/$1$2$3.jpg last;
        rewrite ^/([0-9])([0-9])(-[_a-zA-Z0-9-]*)?(-[0-9]+)?/.+.jpg$ /img/p/$1/$2/$1$2$3$4.jpg last;
        rewrite ^/([0-9])([0-9])([0-9])(-[_a-zA-Z0-9-]*)?(-[0-9]+)?/.+.jpg$ /img/p/$1/$2/$3/$1$2$3$4$5.jpg last;
        rewrite ^/([0-9])([0-9])([0-9])([0-9])(-[_a-zA-Z0-9-]*)?(-[0-9]+)?/.+.jpg$ /img/p/$1/$2/$3/$4/$1$2$3$4$5$6.jpg last;
        rewrite ^/([0-9])([0-9])([0-9])([0-9])([0-9])(-[_a-zA-Z0-9-]*)?(-[0-9]+)?/.+.jpg$ /img/p/$1/$2/$3/$4/$5/$1$2$3$4$5$6$7.jpg last;
        rewrite ^/([0-9])([0-9])([0-9])([0-9])([0-9])([0-9])(-[_a-zA-Z0-9-]*)?(-[0-9]+)?/.+.jpg$ /img/p/$1/$2/$3/$4/$5/$6/$1$2$3$4$5$6$7$8.jpg last;
        rewrite ^/([0-9])([0-9])([0-9])([0-9])([0-9])([0-9])([0-9])(-[_a-zA-Z0-9-]*)?(-[0-9]+)?/.+.jpg$ /img/p/$1/$2/$3/$4/$5/$6/$7/$1$2$3$4$5$6$7$8$9.jpg last;
        rewrite ^/([0-9])([0-9])([0-9])([0-9])([0-9])([0-9])([0-9])([0-9])(-[_a-zA-Z0-9-]*)?(-[0-9]+)?/.+.jpg$ /img/p/$1/$2/$3/$4/$5/$6/$7/$8/$1$2$3$4$5$6$7$8$9$10.jpg last;
        rewrite ^/c/([0-9]+)(-[.*_a-zA-Z0-9-]*)(-[0-9]+)?/.+.jpg$ /img/c/$1$2$3.jpg last;
        rewrite ^/c/([a-zA-Z_-]+)(-[0-9]+)?/.+.jpg$ /img/c/$1$2.jpg last;

        # AlphaImageLoader for IE and fancybox
        rewrite ^images_ie/?([^/]+)\.(jpe?g|png|gif)$ js/jquery/plugins/fancybox/images/$1.$2 last;

        # Web service API
        rewrite ^/api/?(.*)$ /webservice/dispatcher.php?url=$1 last;
   }

   location ~ \.php$ {
       try_files $uri =404;
       fastcgi_split_path_info ^(.+\.php)(/.+)$;
       fastcgi_pass prestashop:9000;
       fastcgi_index index.php;
       include fastcgi_params;
       fastcgi_param SCRIPT_FILENAME $document_root$fastcgi_script_name;
       fastcgi_param PATH_INFO $fastcgi_path_info;
       fastcgi_read_timeout 600;
       proxy_connect_timeout 600;
       proxy_send_timeout 600;
       proxy_read_timeout 600;
       send_timeout 600;
   }
}
Now your Docker Prestashop environment should be working
Setting up your local PrestaShop development environment with Docker Compose really shows how useful containerization can be. It simplifies the whole process of getting different services to work together, letting you concentrate on the important stuff—like developing your own modules or fixing issues in PrestaShop. If you need to hire a team of professional developers check also our web development outsourcing page.