Chatbot survey in React

Chats, often embedded on sites for quick online help, can also be used for making surveys. Let’s imagine asking your client about the rating or overall customer experience.
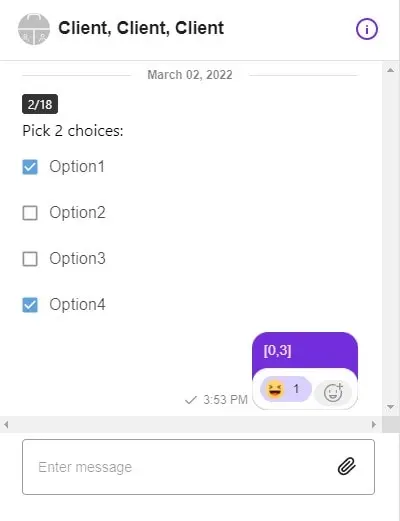
In this tutorial we will create a SendBird Chat with a component for rendering questions and answers similar to a QUIZ. The user will be able to use checkboxes to select his choices.

SendBird Developer Plan
How to start using the SendBird API for Chat? Just register a new account using the ‘Developer Plan’ ! The recently introduced “Developer Plan” is a good proposition for Developers that want to experiment or try new things with the Chat API. It’s also free forever, the only requirement is to log in once per year.
That’s excellent news, now Programmers can test different features without any restriction, and build hobby projects or explore all available SendBird functions. Since April 2021, SendBird UIKits have used an open-source license. This fact encourages Developers to fork source code and build custom solutions. With the Developer Plan available, the Dev Community will flourish even more.
The new plan gives access to all SendBird Pro premium features, the entire list is below:
| Feature description | Developer Plan limits per month | |
| Super groups | A private group chat for thousands of members in a single group. The pro plan supports up to 2,000 members. The enterprise plan supports up to 20,000 members. | 100 MAU, 10 peak concurrent connections |
| Delivery receipts | They let the message sender know that the message has been successfully delivered to the recipient. | 100 MAU, 10 peak concurrent connections |
| Announcements | Deliver bulk messages to thousands of users and channels at the same time. | 100 MAU, 10 peak concurrent connections |
| Auto thumbnail generator | Automatically generates thumbnails for media files in the chat thread. | 1,000 images |
| Auto-image moderation | Automatically detects messages with toxic images and filters them out. | 50 images |
| Advanced moderation | Includes profanity filter, moderation dashboard, and auto-image moderation. | N/A |
| Advanced analytics | Provides 9 metrics about user behaviors. | N/A |
| Message translations | Includes auto message translations, on-demand translations, and push notification translations. | 1,000 characters |
| Message search | Provides chat message search capabilities. | 20,000 messages indexed and 5,000 queries |
| Chatbot interface | Allows chatbots to send and receive messages for support, product recommendations, and more. | 2 chatbots |
SendBird Chatbots
In our simplified example, we are just hardcoding answers in React Chat code using the message.data object. Questions can be sent using the message.message parameter. Having a real survey application, we will have a backend system that will be responsible for generating responses and receiving answers. One solution will be to use the “Bot interface”: SendBird Platform API provides an interface that allows to:
– create a bot with a callback URL to monitor events from users
– have bots join channels and send messages
Bot interface can be used in group channels only. More information about usage: https://sendbird.com/docs/chat/v3/platform-api/guides/bot-interface
The job of the Backend system will be to process incoming data and generate relevant responses.
Survey data
Backend will send data for survey generation via the message.data object. One message can render one survey question. This tutorial focuses on the frontend part, and for the purpose of the demo, we use sample data, prepared directly in the React app:
/**
 * Simulate backend response START
 */
const surveyMsgData = {
    question_id: "9",
    options: ["Option1", "Option2", "Option3", "Option4"],
    correct_choices: 2,
    counter: "2/18",
}
const surveyMsgDataJson = JSON.stringify(surveyMsgData);
message.data = surveyMsgDataJson;
/**
 * Simulate backend response END
 */
Survey in the Chat
To display survey questions, we need to have Widget Chat and the ability to send and receive messages. With the UIKit library, it is super easy to set up. We will use SendBirdProvider, which is the context provider that passes the Chat SDK down to the child components. It’s the most important component in the UIKit for React.
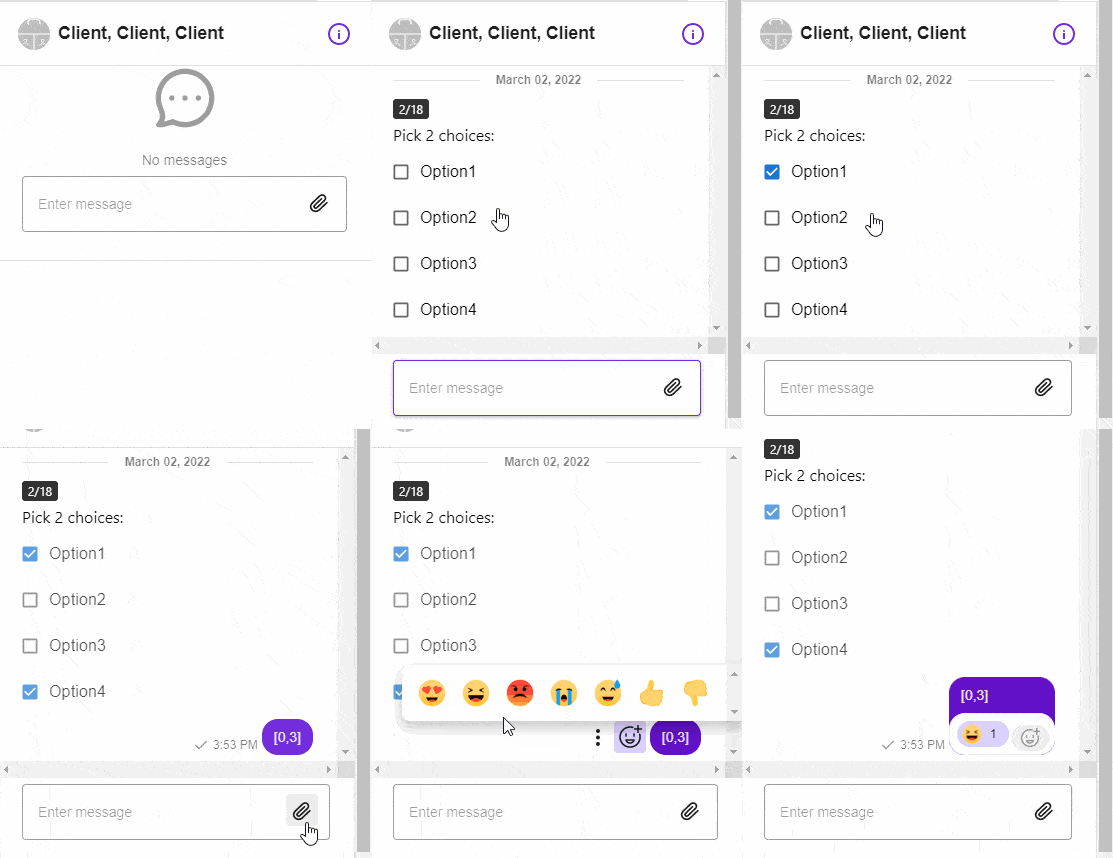
The example question includes checkboxes with predefined answers. Attribute correct_choices represents the number of elements from the list you can pick. Once done, a message with picked answers indexes (first being 0) will be sent to the chat.
The first step is to install the required dependencies:
npm install sendbird-uikit
npm install @mui/material @emotion/react @emotion/styled
npm install @mui/icons-material
Here is the source code for the survey question in the SendBird chat. The main application including Channel and Channel List rendering:
// App.jsx
import React, {useState, useEffect, useCallback} from 'react';
import {
    SendBirdProvider,
    Channel,
    ChannelList
} from 'sendbird-uikit';
import "sendbird-uikit/dist/index.css";
import './App.css';
import {displaySurveyQuestion} from "./RenderSurvey";
/**
 * Configuration
 */
const APP_ID = "AAA";
const USER_ID = "BBB";
const DEFAULT_CHANNEL_URL = "CCC";
export default function App() {
    const channelSort = useCallback((channels) => { // useCallback to memoize the fn
        if (channels.length === 0) {
            return channels;
        }
        const channel = channels.find(c => c.url === DEFAULT_CHANNEL_URL);
        if (!channel) {
            return channels;
        }
        const otherChannels = channels.filter(c => c.url !== channel.url);
        otherChannels.sort(function (a, b) {
            if (a.name < b.name) {
                return -1;
            }
            if (a.name > b.name) {
                return 1;
            }
            return 0;
        });
        return [channel, ...otherChannels];
    }, []);
    /**
     * App body
     */
    const [currentChannelUrl, setCurrentChannelUrl] = useState("");
    return (
        <div className="App">
            <SendBirdProvider appId={APP_ID} userId={USER_ID} theme={'light'} config={{ logLevel: 'all' }}>
                <div style={{display: 'flex', flexDirection: 'column', height: '100%'}}>
                    <ChannelList
                        sortChannelList={channelSort}
                        onChannelSelect={(channel) => {
                            if (channel && channel.url) {
                                setCurrentChannelUrl(channel.url);
                            }
                        }}
                    />
                    <Channel
                        channelUrl={currentChannelUrl}
                        renderCustomMessage={(message, channel) => {
                            if (message.customType === 'survey' || message.message === 'survey') {
                                /**
                                 * Simulate backend response START
                                 */
                                const surveyMsgData = {
                                    question_id: "9",
                                    options: ["Option1", "Option2", "Option3", "Option4"],
                                    correct_choices: 2,
                                    counter: "2/18",
                                }
                                const surveyMsgDataJson = JSON.stringify(surveyMsgData);
                                message.data = surveyMsgDataJson;
                                /**
                                 * Simulate backend response END
                                 */
                                return (
                                    displaySurveyQuestion(message, currentChannelUrl)
                                )
                            }
                        }}
                    />
                </div>
            </SendBirdProvider>
        </div>
    );
}
The RenderSurvey component parses message data, displays checkboxes and handles click events. The MUI library is used for styling.
// src/RenderSurvey.jsx
import React, {useState, useEffect} from 'react';
import SendMessageWithSendBird from "./SendMessage";
import Button from '@mui/material/Button';
import NavigateNextIcon from '@mui/icons-material/NavigateNext';
import CheckIcon from '@mui/icons-material/Check';
import FormGroup from '@mui/material/FormGroup';
import FormControlLabel from '@mui/material/FormControlLabel';
import Checkbox from '@mui/material/Checkbox';
export const RenderSurvey = (props) => {
    const {message, channelUrl} = props;
    const getParsedData = (message) => {
        let data = "";
        if(message.messageType === 'file'){
            return data;
        }
        if(message.data !== 'undefined') {
            data = safelyParseJSON(message.data);
        }
        return data;
    }
    const safelyParseJSON = (json) => {
        let parsed;
        try {
            parsed = JSON.parse(json)
        } catch (e) {
            return false;
        }
        return parsed;
    }
    const [msgData] = useState( getParsedData(message) );
    const [msgToSent, setMsgToSent] = useState({msg: "",msgType: "", isSilent: false, extraData: "", readyToSend: false});
    const[choices, setChoices] = useState([]);
    const[choiceCompleted, setChoiceCompleted] = useState(false);
    const[correctChoices, setCorrectChoices] = useState(msgData["correct_choices"] ? msgData["correct_choices"] : false);
    let question_id = msgData["question_id"] ? msgData["question_id"] : 0;
    let counter = msgData["counter"] ? msgData["counter"] : "";
    let buttonsRaw = msgData["options"] ? msgData["options"] : [];
    const isOpenQuestion = !msgData["correct_choices"];
    useEffect(() => {
        return () => {
            /**
             * reset state
             */
            setMsgToSent({...msgToSent,  readyToSend: false});
            setChoiceCompleted(false);
        };
        // eslint-disable-next-line
    }, [choiceCompleted]);
    useEffect(() => {
        if(choices.length === correctChoices){
            let extraData = {
                question_id : question_id,
                choices: choices
            };
            const extraData2 = JSON.stringify(extraData);
            const msg = JSON.stringify(choices);
            setMsgToSent({msg: msg,msgType: "answer", isSilent: true, extraData: extraData2, readyToSend: true});
        }
        // eslint-disable-next-line
    }, [choices, correctChoices]);
    useEffect(() => {
        return () => {
            setChoiceCompleted(true);
        };
        // eslint-disable-next-line
    }, [msgToSent]);
    const handleClick = (btn, index) => {
        /**
         * Reset state
         */
        setChoiceCompleted(false);
        if(! choices.includes(index)){
            setChoices(prevArray => [...prevArray, index]);
        } else {
            setChoices(prevArray => (
                // remove from array
                prevArray.filter(item => item !== index)
            ));
        }
    }
    const handleOpenQuestion = () => {
        setCorrectChoices(choices.length);
    }
    const component = (!choiceCompleted && msgToSent.readyToSend) ? (<SendMessageWithSendBird extraData={msgToSent.extraData} msg={msgToSent.msg} isSilent={msgToSent.isSilent} customType={msgToSent.msgType} channelUrl={channelUrl} />) : (<></>);
    let msg_div_class = "";
    if(choiceCompleted){
        msg_div_class = " is-action-taken";
    }
    return (
        <div className={msg_div_class}>
            {counter &&
                <span className="badge--question-counter">
                    {counter}
                </span>
            }
            {((correctChoices !== false) && !isOpenQuestion) &&
                <span className="d-block mt2">
                    Pick {correctChoices} choices:
                </span>
            }
            {buttonsRaw.length > 0 &&
                <span className="d-block mb1">
                   <FormGroup row>
                    {buttonsRaw.map((btn, index ) => (
                        <FormControlLabel
                            label={btn}
                            key={index}
                            className="mt1 w100"
                            control={<Checkbox checked={choices.includes(index)}
                                               onChange={() => handleClick(btn, index)}
                                               color="primary"
                                               inputProps={{ 'aria-label': btn }}
                                               size="small" />}
                        />
                    ))}
                    </FormGroup>
                </span>
            }
            {buttonsRaw.length > 0 && isOpenQuestion &&
                <span className="d-block mb1 mt2">
                    <Button onClick={() => handleOpenQuestion()} className="mr2" type="button" variant="contained" color="secondary" size="medium" endIcon={(choiceCompleted) ? <CheckIcon /> : <NavigateNextIcon /> }>Confirm answer</Button>
                </span>
            }
            {component}
        </div>
    )
}
export const displaySurveyQuestion = (message, channelUrl) => {
    return () => (
        // message, choices, setChoices, channelUrl
        <RenderSurvey message={message} channelUrl={channelUrl}/>
    );
}
The SendMessage component uses the withSendBird method. We’re using it for sending a survey response to the Chat.
// src/SendMessage.jsx
import React, { useEffect } from "react";
import {
    withSendBird,
    sendBirdSelectors,
} from "sendbird-uikit";
import "sendbird-uikit/dist/index.css";
const CustomComponent = (props) => {
    const {
        msg,
        customType,
        channelUrl,
        extraData,
        mentionType,
        isSilent,
        sendMessage,
        sdk,
    } = props;
    const sendSelectTypeMessage = (msg, customType, channelUrl, extraData = null, mentionType = null, isSilent = false) => {
        const params = new sdk.UserMessageParams();
        if(!msg){
            return;
        }
        if(customType){
            params.customType = customType;
        }
        params.message = msg;
        if(extraData){
            params.data = extraData;
        }
        sendMessage(channelUrl, params)
            .then(message => {
            })
            .catch(e => {
                console.warn(e);
            });
    }
    useEffect(() => {
        sendSelectTypeMessage(msg, customType, channelUrl, extraData, mentionType, isSilent);
    });
    return(
        <></>
    );
};
const SendMessageWithSendBird = withSendBird(CustomComponent, (state) => {
    const sendMessage = sendBirdSelectors.getSendUserMessage(state);
    const sdk = sendBirdSelectors.getSdk(state);
    return ({
        sendMessage,
        sdk
    });
});
export default SendMessageWithSendBird;
Lastly, some CSS styles:
.d-block{
  display:block !important;
}
.mb1 {
  margin-bottom:0.5rem !important;
}
.mt1 {
  margin-top:0.5rem !important;
}
.w100 {
  width:100% !important;
}
.badge--question-counter {
  font-size: 0.75rem;
  line-height: 1;
  background: #333;
  padding: 4px 6px;
  color: #fff;
  border-radius: 3px;
  margin:5px auto;
  display:inline-block;
}
.is-action-taken button,
.is-action-taken label,
.is-action-taken .react-datepicker,
.is-action-taken .starsRating {
  opacity:0.7;
  pointer-events: none;
}
Chat configuration
Make sure to fill in the proper APP_ID, USER_ID and CHANNEL URL in the configuration section:
/**
 * Configuration
 */
const APP_ID = "AAA";
const USER_ID = "BBB";
const DEFAULT_CHANNEL_URL = "CCC";
Here is the final result. The component can be used for building ChatBots and sending complex surveys to chat members. The results can be saved in the backend database. Such a survey can be used for multiple purposes, including: a customer satisfaction survey or the automation of the recruitment process.

Open question survey
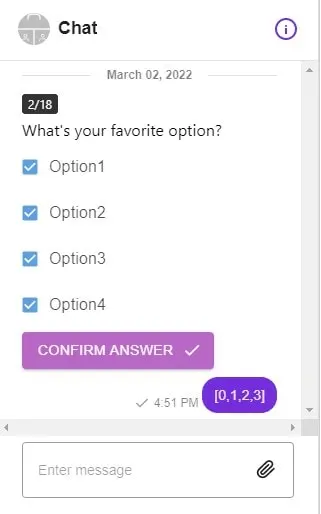
Currently, the user is limited to 2 answers. What about having an open question and allowing the user to pick 1, 2, 3 or 4 answers? It’s quite easy to achieve.
The solution is to slightly modify input data by removing the correct_choices attribute. After applying this change, we will see the additional ‘Confirm answer’ button. Now, the user can pick as many answers as he likes.
/**
 * Message.data for open question (pick as much answers you like)
 */
const surveyMsgData = {
    question_id: "9",
    options: ["Option1", "Option2", "Option3", "Option4"],
    // correct_choices: 2,
    counter: "2/18",
}

That’s it for today’s tutorial. Make sure to follow us for other useful tips and guidelines, and don’t forget to subscribe to our newsletter.


