Product order system without Woocommerce using Contact Form 7

Challenge: implement product ordering form without WooCommerce
Solution: transform Contact Form 7 into a custom product ordering system
Contact Form 7 is one of the most popular form plugins for WordPress, with over 5 million active installations. While it’s great for basic contact forms, its real power lies in how easily developers can extend it. In this guide, we’ll explore how to transform Contact Form 7 into a product ordering system.
Many businesses need a way to accept product orders through their website, but setting up a WooCommerce system can be overkill. Sometimes, you just need a simple form where customers can list the products they want, specify quantities, and add notes. This is where our custom extension comes in.
What makes this solution particularly useful is that it:
- Saves orders directly to your database
- Sends formatted emails with order details
- Validates product quantities
- Handles multiple products per order
Before we dive into the code, let’s make sure you have everything you need:
- WordPress installation (version 5.8 or higher)
- Contact Form 7 plugin (version 6.x)
In the following sections, we’ll build this system step by step. We’ll start with the basic structure, add form processing, create custom validation rules, and finally set up database storage.
Custom Contact Form 7 Product Orders plugin setup
Let’s start by creating the basic structure of our plugin.
First, create a new folder in your WordPress plugins directory called cf7-product-orders. Inside this folder, create a file called cf7-product-orders.php. Here’s what we’ll put in it:
/**
 * Plugin Name: Contact Form 7 - Product Orders Extension
 * Description: Extends Contact Form 7 with product ordering capabilities including dynamic fields, validation, and database storage
 * Version: 1.0.0
 */

// Prevent direct access
if (!defined('ABSPATH')) {
    exit;
}
Next, we need to create a database table to store our orders. WordPress makes this easy with a function called dbDelta. Here’s how we set it up:
function cf7_product_orders_activate() {
    global $wpdb;

    $table_name = $wpdb->prefix . 'cf7_orders';
    $charset_collate = $wpdb->get_charset_collate();

    $sql = "CREATE TABLE IF NOT EXISTS $table_name (
        id bigint(20) NOT NULL AUTO_INCREMENT,
        customer_email varchar(100) NOT NULL,
        customer_name varchar(100) NOT NULL,
        products longtext NOT NULL,
        created_at datetime NOT NULL,
        PRIMARY KEY  (id)
    ) $charset_collate;";

    require_once(ABSPATH . 'wp-admin/includes/upgrade.php');
    dbDelta($sql);

    // Set version in options table
    add_option('cf7_product_orders_version', '1.0.0');
}
register_activation_hook(__FILE__, 'cf7_product_orders_activate');
Our table structure:
- id: Auto-incrementing primary key for unique order identification
- customer_email and customer_name: Fixed-length varchar fields for customer details
- products: Longtext field storing JSON-encoded product data for flexibility
- created_at: Datetime field for order tracking and reporting
We also want to make sure Contact Form 7 is installed before our plugin runs. Here’s how we check for it:
private function is_cf7_active() {
return class_exists(‘WPCF7’);
}
public function check_cf7_dependency() {
if (!$this->is_cf7_active()) {
add_action(‘admin_notices’, function() {
echo ‘<div class=”error”><p>’;
echo esc_html__(‘Contact Form 7 – Product Orders Extension requires Contact Form 7 to be installed and activated.’, ‘cf7-product-orders’);
echo ‘</p></div>’;
});
}
}
Processing form data
Now let’s look at how to handle the data when someone submits a product order. First, we need to understand what data we’re working with. A typical product order form might look like this:
- Customer name
- Customer email
- Multiple product entries (name, quantity, and notes)
Here’s how we process this data:
public function process_product_data($posted_data) {
    if (!isset($posted_data['product-name']) || !is_array($posted_data['product-name'])) {
        return $posted_data;
    }

    $products = array();

    // Get the first array (index 0) which contains our product data
    $names = isset($posted_data['product-name'][0]) ? $posted_data['product-name'][0] : array();
    $quantities = isset($posted_data['product-quantity'][0]) ? $posted_data['product-quantity'][0] : array();
    $notes = isset($posted_data['product-notes'][0]) ? $posted_data['product-notes'][0] : array();

    // Loop through each index
    foreach ($names as $index => $name) {
        // Make sure all required data exists for this index
        if (!empty($name) && isset($quantities[$index])) {
            $products[] = array(
                'name' => sanitize_text_field($name),
                'quantity' => absint($quantities[$index]),
                'notes' => isset($notes[$index]) ? sanitize_textarea_field($notes[$index]) : ''
            );
        }
    }

    $posted_data['formatted_products'] = $products;
    return $posted_data;
}
Next, we need to make sure the quantities are valid:
public function validate_product_quantity($result, $tag) {
    $name = $tag->name;

    if (strpos($name, 'product-quantity') === 0) {
        $value = isset($_POST[$name]) ? intval($_POST[$name]) : 0;

        if ($value <= 0 || $value > 100) {
            $result->invalidate($tag, 'Please enter a quantity between 1 and 100');
        }
    }

    return $result;
}
This validation: * Checks if the field is a product quantity * Makes sure the quantity is between 1 and 100 * Shows an error message if the quantity isn’t valid
To use these functions, you need to add them to your Contact Form 7 hooks:
add_filter('wpcf7_posted_data', array($this, 'process_product_data'));
add_filter('wpcf7_validate_text*', array($this, 'validate_product_quantity'), 10, 2);
Customizing emails and storing CF7 orders
Let’s look at how to send nice-looking order confirmation emails and save orders to our database.
First, let’s make the email look professional with an HTML table:
public function customize_email($contact_form) {
    $submission = WPCF7_Submission::get_instance();

    if (!$submission || !isset($submission->get_posted_data()['formatted_products'])) {
        return;
    }

    $products = $submission->get_posted_data()['formatted_products'];

    // Create HTML table
    $html = '<h2>Order Details</h2>';
    $html .= '<table style="width:100%; border-collapse:collapse; margin-top:20px;">';
    $html .= '<tr style="background:#f8f8f8;">
                <th style="padding:10px; border:1px solid #ddd;">Product</th>
                <th style="padding:10px; border:1px solid #ddd;">Quantity</th>
                <th style="padding:10px; border:1px solid #ddd;">Notes</th>
              </tr>';

    foreach ($products as $product) {
        $html .= sprintf(
            '<tr>
                <td style="padding:10px; border:1px solid #ddd;">%s</td>
                <td style="padding:10px; border:1px solid #ddd;">%d</td>
                <td style="padding:10px; border:1px solid #ddd;">%s</td>
            </tr>',
            esc_html($product['name']),
            esc_html($product['quantity']),
            esc_html($product['notes'])
        );
    }

    $html .= '</table>';

    // Add table to email
    $mail = $contact_form->prop('mail');
    $mail['body'] = str_replace('[product-table]', $html, $mail['body']);
    $contact_form->set_properties(array('mail' => $mail));
}
Next, let’s save the order to our database:
public function save_order($contact_form) {
    global $wpdb;
    $submission = WPCF7_Submission::get_instance();

    if (!$submission) {
        return;
    }

    $data = $submission->get_posted_data();

    if (!isset($data['formatted_products'])) {
        return;
    }

    // Insert order into database
    $wpdb->insert(
        $this->table_name,
        array(
            'customer_email' => sanitize_email($data['your-email']),
            'customer_name' => sanitize_text_field($data['your-name']),
            'products' => json_encode($data['formatted_products']),
            'created_at' => current_time('mysql')
        ),
        array('%s', '%s', '%s', '%s')
    );
}
To make these functions work, add them to your hooks:
add_action('wpcf7_before_send_mail', array($this, 'customize_email'));
add_action('wpcf7_mail_sent', array($this, 'save_order'));
CF7 form creation
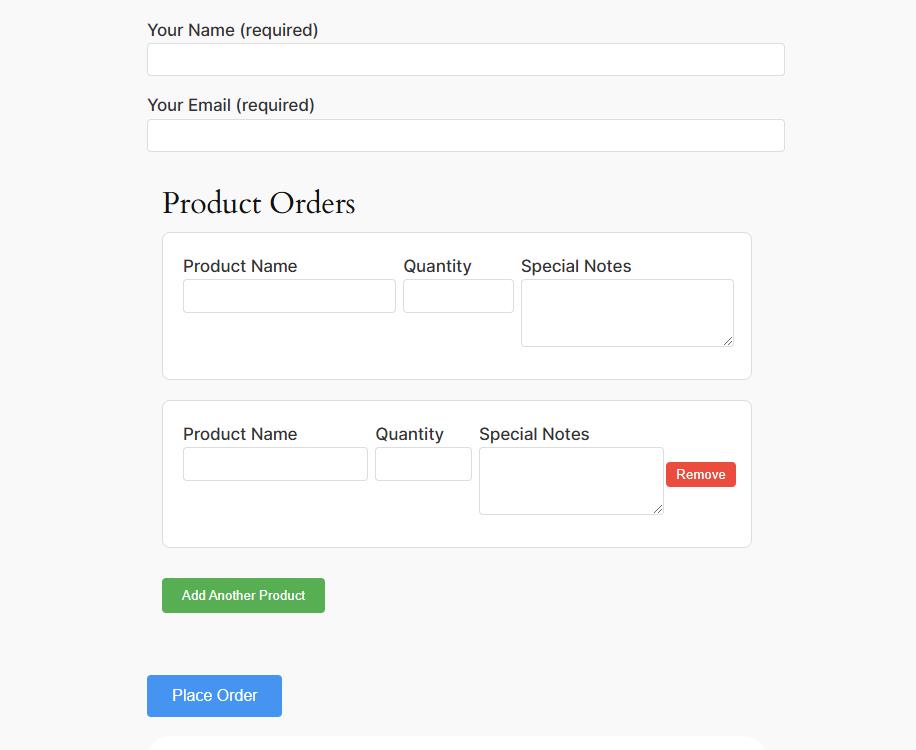
Now that we’ve built all the backend functionality, let’s look at how to create and configure your Contact Form 7 form.
First, create a new form in Contact Form 7 with this structure to handle multiple products.
<div class="customer-info">
    <label>Your Name (required)
        [text* your-name] </label>

    <label>Your Email (required)
        [email* your-email] </label>
</div>

<div class="product-list">
    <h3>Product Orders</h3>

    <div class="product-entries">
        <div class="product-entry">
            <label>Product Name
                [text* product-name class:product-name] </label>

            <label>Quantity
                [number* product-quantity min:1 max:100] </label>

            <label>Special Notes
                [textarea product-notes] </label>
        </div>
    </div>

    <button type="button" class="add-product button">Add Another Product</button>
</div>

[submit "Place Order"]
Contact Form 7 by default doesn’t support dynamically adding multiple sets of form fields. When submitting form data with multiple entries, we need to:
- Create properly structured array-based field names for PHP processing
- Allow users to dynamically add/remove product entries
- Maintain unique identifiers for each set of fields
- Ensure proper data submission format for server-side processing
The first product entry needs special handling because it’s created by Contact Form 7 directly. We convert its field names to match our array structure: product-name[0][0], where:
- First index [0]: Represents the form group
- Second index [0]: Represents the item index within that group
When adding new entries:
- We clone the first entry using cloneNode(true) to maintain all HTML structure and attributes
- productCount helps maintain unique indexes for each entry
- Deep cloning (true parameter) ensures we copy all nested elements and attributes
Full javascript code:
document.addEventListener('DOMContentLoaded', function() {
    const addButton = document.querySelector('.add-product');
    const productList = document.querySelector('.product-entries');

    // Initialize the first entry
    if (productList.querySelector('.product-entry')) {
        const firstEntry = productList.querySelector('.product-entry');
        convertToArrayFields(firstEntry, 0, 0);
    }

    if (addButton && productList) {
        addButton.addEventListener('click', function() {
            const productCount = productList.children.length;
            const firstEntry = productList.querySelector('.product-entry');
            const productEntry = firstEntry.cloneNode(true);

            // Convert fields to array format and clear values
            convertToArrayFields(productEntry, 0, productCount);
            clearFields(productEntry);

            // Add or update remove button
            let removeButton = productEntry.querySelector('.remove-product');
            if (!removeButton) {
                removeButton = document.createElement('button');
                removeButton.type = 'button';
                removeButton.className = 'remove-product button';
                productEntry.appendChild(removeButton);
            }
            removeButton.textContent = 'Remove';

            // Update remove button click handler
            removeButton.onclick = function() {
                this.parentElement.remove();
                updateAllIndexes();
            };

            // Add the new entry to the list
            productList.appendChild(productEntry);
        });
    }

    function convertToArrayFields(entry, groupIndex, itemIndex) {
        entry.querySelectorAll('input, textarea').forEach(field => {
            const baseName = field.getAttribute('data-base-name') || field.name;
            // Store the original base name if not already stored
            if (!field.getAttribute('data-base-name')) {
                field.setAttribute('data-base-name', baseName);
            }
            // Update name to nested array format (e.g., 'product-name[0][0]')
            field.name = `${baseName}[${groupIndex}][${itemIndex}]`;
        });
    }

    function clearFields(entry) {
        entry.querySelectorAll('input, textarea').forEach(field => {
            field.value = '';
        });
    }

    function updateAllIndexes() {
        const entries = productList.querySelectorAll('.product-entry');
        entries.forEach((entry, index) => {
            convertToArrayFields(entry, 0, index);
        });
    }
});
The JavaScript creates a structured data format that looks like this when submitted:
[
    'product-name' => [
        [0] => [
            [0] => 'First Product',
            [1] => 'Second Product',
            // ... additional products
        ]
    ],
    'product-quantity' => [
        [0] => [
            [0] => '5',
            [1] => '3',
            // ... additional quantities
        ]
    ]
]
This structure allows PHP to easily process multiple product entries while maintaining the relationship between product names, quantities, and notes.
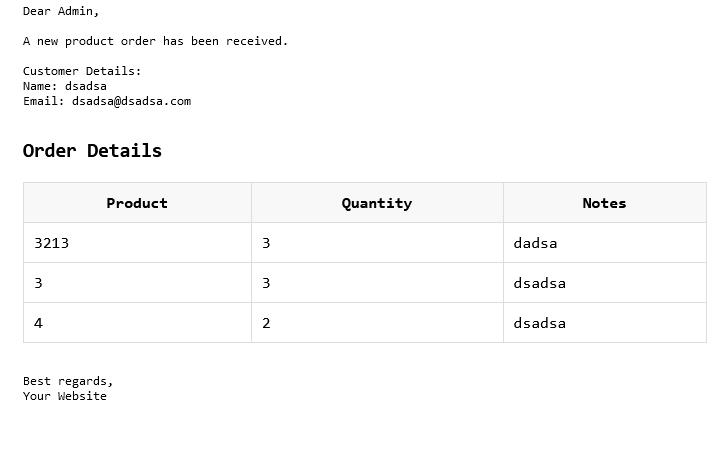
To configure the email template, go to the form’s Mail tab and set it up like this:
Dear Admin,

A new product order has been received.

Customer Details:
Name: [your-name]
Email: [your-email]

[product-table]

Best regards,
Your Website
You made your eCommerce shop on WordPress without Woocommerce only by using Contact Form 7 plugin
This customization demonstrates the flexibility of Contact Form 7 beyond basic contact forms. By combining WordPress’s native database functions, Contact Form 7’s hooks, and custom JavaScript, we’ve created a lightweight product ordering system.
While this solution is perfect for businesses needing straightforward order collection, there are scenarios where you might want to consider a full e-commerce platform like WooCommerce:
- Need for payment gateway integration
- Complex inventory management requirements
- Advanced shipping calculations
- Customer account management
- Complex tax rules and regulations
Source code
The complete source code for this plugin is available in our GitHub repository: Contact Form 7 Product orders extension: https://github.com/createit-dev/333-CF7-Custom-order-forms